Pages

Saturday, July 22, 2017

Web services in Java SE, Part 1

Java Standard Edition (SE) 6 included support for Web services. This post begins a four-part series on Web services in Java SE by explaining what Web services are and overviewing Java SE's support for them. Future posts will use this support to build SOAP-based and RESTful-based Web services, and will also cover advanced Web service topics.

What are web services?

Wikipedia defines Web service as "a software system designed to support interoperable machine-to-machine interaction over a network." A more detailed definition can be obtained by first defining this term's parts:

  • Web: An enormous interconnected network of resources, where a resource is a Uniform Resource Identifier (URI)-named data source such as a PDF-based document, a video stream, a Web page, or even an application. These resources can be accessed by using standard Internet protocols such as HyperText Transfer Protocol (HTTP) or Simple Mail Transfer Protocol (SMTP).
  • Service: A server-based application or software component that exposes a resource to clients via an exchange of messages according to a message exchange pattern (MEP). The request-response MEP is typical.
  • Given these definitions, a Web service is a server-based application/software component that exposes a Web-based resource to clients via an exchange of messages. These messages may be formatted according to Extensible Markup Language (XML) or JavaScript Object Notation (JSON). Also, these messages can be thought of as invoking Web service functions and receiving invocation results. Figure 1 illustrates this message exchange.

    Figure 1. A client accesses a resource by exchanging messages with a Web service

    A client accesses a resource by exchanging messages with a Web service

    Web services can be classified as simple or complex. Simple Web services don't interact with other Web services (e.g., a standalone server-based application with a single function that returns the current time for a specified time zone). In contrast, complex Web services often interact with other Web services. For example, a generalized social network Web service might interact with Twitter and Facebook Web services to obtain and return to its client all Twitter and all Facebook information for a specific individual. Complex Web services are also known as mashups because they mash (combine) data from multiple Web services.

    SOAP-based web services

    A SOAP-based Web service is a widely used Web service category that's based on SOAP, an XML language for defining messages (abstract function invocations or their responses) that can be understood by both ends of a network connection. An exchange of SOAP messages is called an operation, which corresponds to a function call and its response, and which is depicted in Figure 2.

    Figure 2. A Web service operation involves input and output messages

    A Web service operation involves input and output messages

    Related operations are often grouped into an interface, which is conceptually similar to a Java interface. A binding provides concrete details on how an interface is bound to a messaging protocol (particularly SOAP) to communicate commands, error codes, and other items over the wire. The binding and a network address (an IP address and a port) URI is known as an endpoint, and a collection of endpoints is a Web service. Figure 3 presents this architecture.

    Figure 3. Interfaces of operations are accessible via their endpoints

    Interfaces of operations are accessible via their endpoints

    SOAP is often used with Web Services Description Language (WSDL, pronounced whiz-dull), an XML language for defining a Web service's operations. A WSDL document is a formal contract between a SOAP-based Web service and its clients, providing all details for interacting with the Web service. This document lets you group messages into operations and operations into interfaces. It also lets you define a binding for each interface as well as the endpoint address.

    As well as supporting WSDL documents, SOAP-based Web services have the following properties:

  • The ability to address complex nonfunctional requirements such as security and transactions: These requirements are made available via various specifications. To promote interoperability among these specifications, the Web Services Interoperability Organization (WS-I) (an industry consortium) was formed. WS-I has established a set of profiles, where a profile is a set of named Web service specifications at specific revision levels, along with a set of implementation and interoperability guidelines recommending how the specifications may be used to develop interoperable Web services. For example, the very first profile, WS-I Basic Profile 1.0, consists of the following set of nonproprietary Web service specifications:
  • SOAP 1.1
  • WSDL 1.1
  • Universal Description Discovery and Integration (UDDI) 2.0
  • XML 1.0 (Second Edition)
  • XML Schema Part 1: Structures
  • XML Schema Part 2: Datatypes
  • RFC2246: The Transport Layer Security Protocol Version 1.0
  • RFC2459: Internet X.509 Public Key Infrastructure Certificate and CRL Profile
  • RFC2616: HyperText Transfer Protocol 1.1
  • RFC2818: HTTP over TLS
  • RFC2965: HTTP State Management Mechanism
  • The Secure Sockets Layer Protocol Version 3.0
  • Additional profile examples include WS-I Basic Security Profile and Simple SOAP Binding Profile. For more information on these and other profiles, visit the WS-I website. Java SE supports the WS-I Basic Profile.

  • The ability to interact with a Web service asynchronously: Web service clients should be able to interact with a Web service in a nonblocking, asynchronous manner. Client-side asynchronous invocation support of Web service operations is provided in Java SE.
  • SOAP-based Web services execute in an environment that includes a service requester (the client), a service provider, and a service broker. This environment is shown in Figure 4.

    Figure 4. A SOAP-based Web service involves a service requester, a service provider, and a service broker (e.g., UDDI)
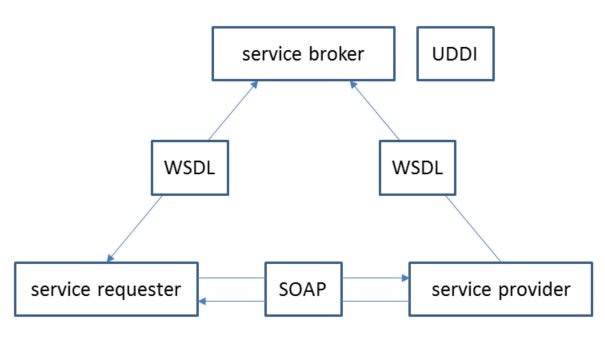
    A SOAP-based Web service involves a service requester, a service provider, and a service broker (e.g., UDDI)

    The service requester, typically a client application (e.g., a Web browser), or perhaps another Web service, first locates the service provider in some manner. For example, the service requester might send a WSDL document to a service broker, which responds with another WSDL document identifying the service provider's location. The service requester then communicates with the service provider via SOAP messages.

    Service providers need to be published so that others can locate and use them. In August 2000, an open industry initiative known as Universal Description, Discovery, and Integration (UDDI) was launched to let businesses publish service listings, discover each other, and define how the services or software applications interact over the Internet. However, this platform-independent, XML-based registry wasn't widely adopted and currently isn't used. Many developers found UDDI to be overly complicated and lacking in functionality, and opted for alternatives such as publishing the information on a website. For example, Google once made its public Web services (e.g., Google Maps) available at http://code.google.com/more/.

    The SOAP messages that flow between service requesters and service providers are often unseen, being passed as requests and responses between the SOAP libraries of their Web service protocol stacks. However, it's possible to access these messages directly, as you will discover later in this series.

    RESTful web services

    SOAP-based Web services can be delivered over protocols such as HTTP, SMTP, FTP, and Blocks Extensible Exchange Protocol (BEEP). Delivering SOAP messages over HTTP can be viewed as a special kind of RESTful Web service.

    A RESTful Web Service is a widely used Web service category that's based on Representational State Transfer (REST), a software architecture style for distributed hypermedia systems (systems in which images, text, and other resources are located around networks and are accessible via hyperlinks). The hypermedia system of interest in a Web services context is the World Wide Web.

    The central part of REST is the URI-identifiable resource. REST identifies resources by their Multipurpose Internet Mail Extensions (MIME) types (such as text/xml). Also, resources have states that are captured by their representations. When a client requests a resource from a RESTful Web service, the service sends a MIME-typed representation of the resource to the client.

    Clients use HTTP's POST, GET, PUT, and DELETE verbs to retrieve resource representations and to manipulate resources. REST maps these verbs onto the database Create, Read, Update, and Delete (CRUD) operations, as follows:

  • POST: Create new resource based on request data.
  • GET: Read existing resource without producing side effects (don't modify the resource).
  • PUT: Update existing resource with request data.
  • DELETE: Delete existing resource.
  • Each verb is followed by a URI that identifies the resource. (This immensely simple approach is fundamentally incompatible with SOAP's approach of sending encoded messages to a single resource.) The URI might refer to a collection, such as http://javajeff.ca/library, or to an element of the collection, such as http://javajeff.ca/library/9781484219157 -- these URIs are only illustrations.

    For POST and PUT requests, XML-based resource data is passed as the body of the request. For example, you could interpret POST http://javajeff.ca/library HTTP/ 1.1 (where HTTP/ 1.1 describes the requester's HTTP version) as a request to insert POST's XML data into the http://javajeff.ca/library collection resource.

    For GET and DELETE requests, the data is typically passed as query strings, where a query string is that portion of a URI beginning with a ? character. For example, where GET http://javajeff.ca/library might return a list of identifiers for all books in a library resource, GET http://javajeff.ca/library?isbn=9781484219157 would probably return a representation of the book resource whose query string identifies International Standard Book Number (ISBN) 9781484219157.

    REST also relies on HTTP's standard response codes, such as 404 (requested resource not found) and 200 (resource operation successful), along with MIME types (when resource representations are being retrieved).

    Web service support in Java SE

    Before Java SE 6, Java-based Web services were developed exclusively with the Java Enterprise Edition (EE) SDK. Although Java EE is preferred for developing Web services from a production perspective, because Java EE-based servers provide a very high degree of scalability, a security infrastructure, monitoring facilities, and so on, the repeated deployment of a Web service to a Java EE container has often been time consuming, slowing down development. Java SE 6 simplified and accelerated Web services development by adding APIs, annotations, tools, and a lightweight HTTP server (for deploying Web services to a simple Web server and testing them in this environment) into its core.

    APIs

    Java SE provides several APIs that support Web services. Along with various JAXP APIs (SAX, DOM, StAX, and so on) that I discuss in Java XML and JSON, Java SE provides the JAX-WS, JAXB, and SAAJ APIs:


    Source: Web services in Java SE, Part 1

    Friday, July 21, 2017

    Best Online Courses To Teach Yourself Icon Design

    It's easier than ever to teach yourself web design using the litany of resources online. Premium courses offer the highest quality and the most in-depth lessons so if you can swing it they're worth the price.

    But which courses are the best of the bunch?

    In this guide I'll share my top picks for courses on icon design. With these courses you can easily teach yourself how to craft impeccable icons from scratch for websites, mobile apps, or graphic design projects.

    Designing Icons

    designing icons lynda

    designing icons lynda

    You'll find icons everywhere from social networking sites to small business pages and blogs. Icons are useful to convey ideas visually and if there's any reason to learn icon design it should be to simplify the user experience.

    With Designing Icons you'll get a crash course into the world of icon design. This includes almost 3 hours of video recordings teaching you how icons are made from start to finish.

    You'll learn how to plan icons and how to use them so they fit properly into a website. You'll also learn best practices for exporting icons into SVGs and other bitmap formats for the web.

    A big part of icon design is brainstorming and coming up with relevant ideas that match your project. This takes up a good portion of the course so you'll learn how to organize your thoughts visually before opening Photoshop or Illustrator.

    The instructor also expects a certain familiarity with the pen tool so it helps if you've already practiced a bit on your own.

    Still if you just follow the videos step-by-step you'll walk away with a solid understanding of designing for the web.

    Creating Icon Fonts for the Web

    illustrator icon design

    illustrator icon design

    Glyph icons are phenomenal for beginners since they're flat and relatively simple to create. Most glyphs are just shapes paired together to create larger shapes.

    But these glyph icons can go so much further than static PNGs. These can be used as icon fonts on the web to dramatically cut down HTTP requests and simplify the coding process.

    In the course Creating Icon Fonts for the Web you'll learn how to craft and export shapes into full icon fonts that you can reuse on any project. Icon fonts are fully supported by modern web browsers so they're 100% safe.

    And this course starts at the very beginning with the absolute basics of icon design, how it works, and what sort of skills you'll need to develop. The teacher uses Adobe software to create the icons but also teaches design with Glyphs Mini, a Mac-only program for exporting icon fonts.

    If you're a Windows user then this course may not prove very useful. It's a solid intro to icon design but unless you have an OS X machine you won't be able to export the icons into fonts.

    Creating Icons with Photoshop

    icons with photoshop course

    icons with photoshop course

    Many designers prefer Illustrator for vector graphics but Photoshop is often used in web design. This can make it tough moving vectors from one program to another.

    If you're a big Photoshop designer then it's worth learning icon design in the PS environment. Creating Icons with Photoshop is a lengthy course in the advanced level of Photoshop design. It's hosted by instructor Justin Seeley, an expert in PS workflows who knows how to reach an audience.

    You certainly don't need to be an expert in Photoshop to work through this course. But you should have some prior experience using the pen tool and a bit of comfort designing icons.

    Generally speaking, this course is much more geared towards people who already design icons but want to take their skills to the next level. Especially if you've already used Illustrator and want to bring that skillset over to Photoshop.

    Many the tools panels and keyboard shortcuts are quite different so there is a bit of a learning curve. But Justin walks your through the whole process so you'll learn pretty much everything you need to know about PS icon design.

    Creating Icons with Illustrator

    creating illustrator icons

    creating illustrator icons

    On the flip side if you're a complete novice to icon design I recommend Creating Icons with Illustrator also taught by Justin Seeley.

    You'll learn about the icon design process and how you should approach new projects from start to finish. Illustrator is a very complex tool but if you focus on one subject it's a lot easier to learn. That's why this course works so well for complete beginners.

    Each video lesson covers a new topic ranging from icon ideas to grid systems, the pen tools, and saving vector symbols into your own symbol library. He also explains the export process and how you can port these vectors over to Photoshop.

    Whether you're designing for websites, mobile apps, or desktop software, this course will set you on the right track to master icon design.

    But you also need to put in the effort on your end to really grasp these ideas. So don't expect to just watch these videos and walk away with profound icon design knowledge.

    Drawing Vector Graphics: Iconography

    drawing icons course vectors

    drawing icons course vectors

    Some designers also practice sketching and imaginative art to improve their design skills.

    That's why Drawing Vector Graphics: Iconography is perfect for the trained or practicing artist. You'll learn how to combine drawing skills with digital design work to create icons that really pop.

    Over a total of four hours you'll learn the differences between shapes and fully realized icons. Once you can look at icons as many different shapes you'll finally see how icon design really works.

    This is an ever-growing process so there's always more to learn.

    But by starting with this course you'll have a much easier time working through drawings and approaching icon design from an artistic viewpoint.

    Note: it is good to have some pre-existing artistic skills but they're not required. However you will need to be willing to sketch ideas and work in pencil so if you only want to do digital work you should skip this course.

    Creating Web Icons with SVG

    web icons with svg

    web icons with svg

    The newest trend in web design is SVG work and it's growing fast. These vector graphics are supported by all modern browsers and they're easier to export for the web using icon design tools.

    Hence this incredible Lynda course Creating Web Icons with SVG. It is the de-facto resource for anyone interested in the SVG filetype and how to make it work online.

    SVGs are really just coordinates that can be resized without quality loss. On the web they can be exported as XML data which can then be embedded into your HTML page. This seemed like a pipe dream a few years ago but now it's just common knowledge in the design space.

    This course delves into HTML/CSS code along with PS/AI design techniques offering a good mix of both sides. As a web designer you should be comfortable coding and designing so this course will push you outside your comfort zone either way.

    Early chapters talk about SVG filetypes and how they work on the web. Later lessons get into command line tools to simplify the exporting and combining of SVG sprites. So there's a whole buffet of knowledge in this course just waiting to be consumed by curious web designers.

    Creating Infographics with Illustrator

    infographic design course

    infographic design course

    One good reason to learn icon design is to jump onto the infographics trend. This has been slowly rising since the late 2000s and nowadays it's easy to find infographics on every topic imaginable.

    Mordy Golding teaches this lengthy 4+ hour course titled Creating Infographics with Illustrator. This is truly a complete start-to-finish guide on infographic design and how to craft the perfect resource on any topic.

    Many lessons delve into icon design because they're a staple of quality infographics. But you'll also learn about color selection, composition, and information design. Remember that real human beings want to consume your infographic as easily as possible.

    This course focuses on Adobe Illustrator so you should already be comfortable using the basic tools. Following many practice projects you'll learn how to create bar charts, graphs, and line icons that fit with various themes.

    As much as you'll learn icon design you'll also learn about information design and digital graphic design. It's an all-encompassing course and it should be mandatory viewing for any aspiring infographic artist.

    Master the Pen Tool

    pen tool mastery course

    pen tool mastery course

    If there's any tool you absolutely must learn it's the pen tool. You can pick up all the basics of Illustrator and still have a lot to learn with the pen tool.

    This is because it's not just one tool, but rather a series of tools that help you manipulate vector elements.

    In the Udemy course Master the Pen Tool you'll learn how this works in Photoshop and Illustrator, plus how you can use this to your advantage while designing icons. This course is great for beginners who have no prior experience and just want to dive into the workload.

    Various lessons cover anchor point manipulation, combining shapes, and working with bezier handles which is generally the toughest skill to master.

    But if you follow through with these lessons you'll come out the other side well prepared to dive into professional icon design. Plus the pen tool is something you'll use a lot in your design career so it's a topic you'll eventually have to study.

    Master App Icon Design for iPhone & Android

    master app icon course

    master app icon course

    Mobile app icons are just as necessary now as they were in 2008 when the app store launched. Every great mobile application needs a solid mobile app icon.

    And with this mobile app course you'll learn all the fundamentals of crafting pixel-perfect app icons for Android & iOS devices. These cover the majority market share of smartphone users and they support the largest app stores in the world.

    However both app stores have their own specifications for icon design that you need to follow to the letter. Apps can be rejected for submitting icons that don't fit specific dimensions or that don't use proper filenames.

    Thankfully this small intro course is here to help. You'll use Illustrator and Photoshop to create impressive app icons from scratch that look sleek and fully comply with modern standards. And you'll learn about common pitfalls in the mobile icon workflow to help you avoid what most beginners don't know about.

    For the price this is an excellent resource and if you're working in the mobile app space it'll prove invaluable to your learning process.

    Create Flat Icons in Illustrator

    flat icons illustrator course

    flat icons illustrator course

    New designers need something easy to start with and that's usually a flat design workflow. By focusing more on colors and shapes you won't need to worry about 3D effects or layer styles.

    Flat design is notorious on the web but it's also a great style to use for icon design. In this Udemy icon course you'll learn how to design custom flat icons from scratch using Adobe Illustrator.

    This forces you to work with vector shapes that are easy to scale and easy to rework. However these don't always play nice with layer effects which makes them perfect for the flat style.

    You can merge some basic shapes, restyle the colors, and presto! A brilliant flat iconset ready for publishing.

    In total the course spans 4+ hours of video with a dozen supplemental resources like cheatsheets and tests. Along the way you'll learn about the Illustrator design process and how you can use shortcuts to speed up the workflow.

    If you're a complete newbie this is a great course to start with. And if you have some experience but want to master the flat icon style this is also a fantastic course to pick up.

    Icon & Logo Symbol Design

    logo symbol design course

    logo symbol design course

    For something a little broader consider grabbing a copy of Icon & Logo Symbol Design by logo designer Daniel Evans.

    This course focuses more on the fundamentals of icon design looking towards philosophy and decision making. You'll need to come up with ideas for icons before you can follow through with them.

    These lessons will teach you how to think and how to follow directions to create masterful pieces of artwork. You'll start by sketching icon designs on paper and scanning your final drafts into Illustrator.

    After that you'll learn how to replicate your sketches using the shape tools and various pen tools. This way you can manipulate shapes to fit your goals and ultimately plan the final product well in advance.

    If you have no artistic skillset that's still okay. You don't need finished sketches but rather outlines and basic ideas down on paper. If you're willing to put in the time you will get a lot from this course in just a few short videos.

    The Art of Icon Design

    art of icon design course

    art of icon design course

    Last but certainly not least is The Art of Icon Design. This is one of the pricier courses and it is surprisingly short at just under 2 hours.

    But this is also one of the few courses that takes you from a complete beginner up to a skilled practitioner. You'll want to have a lot of interest in drawing and sketching if you decide to follow this course.

    It's heavy on the art portion but I also believe this is insanely valuable to any serious icon designer. If you can't sketch your ideas you'll always be limited compared to the designer who can.

    Thankfully this is a course you can rewatch many times over and still glean knowledge. I recommend this for complete beginners who don't know where to start, but who recognize the importance of sketching for icon design work.

    And with that said, that's my list! These are my top picks for icon design courses and they span a wide gamut from basic sketching to detailed vector designs and infographics.

    No matter what your skill level or your goals I guarantee these courses will help. It's just about matching your current skillset with the appropriate courses to make sure you're moving in the right direction.


    Source: Best Online Courses To Teach Yourself Icon Design

    Thursday, July 20, 2017

    Bloc Expands Access to Coding & Design Bootcamps, Offers Part-Time Online Programs and Deferred Tuition Repayment

    Bloc Expands Access to Coding & Design Bootcamps, Offers Part-Time Online Programs and Deferred Tuition Repayment

    SAN FRANCISCO, CA - Bloc, the industry-leading online coding and design bootcamp, and Skills Fund, the leading student financing and quality assurance platform for accelerated vocational training programs, today announced new deferred tuition repayment options for new students in the US.

    Founded in 2011, Bloc offers scalable, cost-efficient, online programs to adults pursuing new careers in software engineering, web development, and design. Amidst a climate of industry consolidation seven bootcamps closed in the past year alone Bloc remains a proven online option for working adults who aspire to new careers in tech but cannot afford to quit their job to attend class in-person.

    The new financing option launched today allows Bloc students to defer between 83-95% of tuition and interest payments until after their program is complete and they possess the necessary skills to pursue a new career. For example, tuition for Bloc's Part-Time Web Developer Track is $8,800, but students who finance their tuition with Skills Fund can pay just $69 per month while completing the program.

    With a structured part-time model, a tuition reimbursement guarantee, and new advantageous financing options for students with limited cash flow or credit, Bloc has removed the biggest obstacles for a massive population of students aspiring to new careers in high-demand technology professions.

    "We are excited to expand the advantageous financing options available for our career-focused programs, and make transformational educational opportunities at Bloc available to even more students. Now almost anyone willing to commit to the challenge of acquiring new skills can improve their lives with a promising new career and greater earning power," says Clint Schmidt, CEO of Bloc.

    "Today, Skills Fund and Bloc step beyond the expected bounds of an online accelerated learning program with the enhancement of our student access-focused solutions," said Dr. Joseph Kozusko, co-founder and Chief Growth Officer of Skills Fund. "The Access Program enables capable students from diverse backgrounds and locations throughout the country to transform their career opportunities, credit health, and ultimate economic mobility."

    Page 2 >>


    Source: Bloc Expands Access to Coding & Design Bootcamps, Offers Part-Time Online Programs and Deferred Tuition Repayment

    Wednesday, July 19, 2017

    Software Sales Representative Vacancy in Nairobi Kenya (100K)

    Jul 19, 2017 Our client, a growing software I.T Company that specializes in hosting, website design, mobile and web application development is looking for a competitive, self-motivated individual to join the team as a Software I.T Sales Representative to be based in Nairobi.  The successful candidate MUST have previous experience in software I.T sales business to business.  Key Responsibilities:
  • Pro-Active daily contact with named accounts
  • Consistent growth of active client base
  • Identifying and establishing new business
  • Organising sales visits
  • Preparing tenders, proposals and quotations
  • Providing pre-sales and post-sales support
  • Negotiating contracts & Terms and Conditions
  • Writing reports and sales literature
  • Providing product education and advice
  • Attending trade exhibitions, conferences and meetings
  • Ensuring that sales targets are met.
  • Reviewing cost and sales performance
  • Qualifications:
  • Must have a Degree/Diploma in I.T.
  • Must have at least 3 years' experience in software I.T sales.
  • Must have the ability to develop a prospect list, build a pipeline of opportunities and close them.
  • Must have proven experience in meeting sales targets.
  • Must be articulate and well presentable.
  • Must have a current contact list and able to hit the ground running.
  • Must be comfortable to work for a start-up.
  • Must be dynamic, able to handle and work independently.
  • Possess confidence and leadership quality.
  • Monthly gross salary:  Ksh 50,000 – Ksh 100,000 (Approx. $ 500 – 1,000) plus benefits.  Deadline: 18th August 2017           Applications:   To apply, please follow the link:  http://bit.ly/2u9aeoh   We endeavour to make contact with all of our applicants, but unfortunately high volumes of applications make this unrealistic. If you do not hear from us within two weeks your application has not been successful on this occasion. This does not mean you will not be considered for future roles so please keep an eye on our job board and apply for positions that match your skills and experience.   *** Leading Recruitment & Executive Search Company in Kenya; Summit Recruitment & Search, Blixen Court, Karen Road, Karen **


    Source: Software Sales Representative Vacancy in Nairobi Kenya (100K)

    Tuesday, July 18, 2017

    A List of CAD Software Programs, Both Paid and Free

    [Thumbnail image credit: By Freeformer - Created and originally uploaded to the English Wikipedia by Freeformer, CC BY-SA 3.0]

    Designing 3D parts is tough, but with good software it becomes easier. Everyone has their favorite tool, and below we outline some of the most popular CAD programs. And if you're prototyping on a budget, or have a quick fix to make, there's lots of great free tools out there for creating and editing 3D models too.

    3D Studio Max (3DS Max) was developed by Autodesk, is one of the gold standard programs for 3D modeling, animation, and graphical rendering. It is used frequently in the movie industry and in the creation of video games, and is especially useful for creating lifelike representations of living things and environments. Its tools are arguably more robust than necessary for modeling engineering parts; that is, its tool-set may be better suited for figure modeling and artistic projects - while a program like Rhino, Pro-E, or Inventor is better suited for machine components - especially when scale matters.

    3DS Max comes equipped with a wide range of tools capable of adding impressive textures and skins to 3D models. When it comes to 3D printing, these tools are much less useful than in the world of rendering and computer graphics / simulation. An exported 3D printing file will rarely, if ever, maintain visually-relevant surface data.

    The considerable cost for a 3DS Max license can be seen as a relatively high barrier for entry. A single license costs 3,675 USD in 2014. A short-run free trial is also available. It should also be noted, however, that a free 3-year license is available for students.

    Adobe Suite harnesses the power of Photoshop in the Creative Cloud to enable editing and creating 3D models. This relatively new set of features may seem lacking to advanced modelers who are more familiar with other premium software, however it is comparatively easy to use and easy to learn for those who are already experienced with Photoshop and the Adobe Suite. Adobe's effort to enable quick export of 3D printable files should not be overlooked. Expect them to add additional functionality and features in the future.

    Autodesk Inventor was created with mechanical design in mind, is an incredibly robust piece of software capable of 3D mechanical design, documentation, and product simulation. Digital prototyping of the highest quality can be achieved with Autodesk Inventor. It is especially suited for mechanical engineering applications.

    The program has two flavors: Autodesk Inventor and Autodesk Inventor Professional. The vanilla version allows users to created detailed drawings, assemblies, and CAD models. The professional version adds simulation, routed systems, and tooling capabilities. A full professional license costs $7,295 USD. A free 3-year license is available for students.

    CATIA was created by the same company as SolidWorks, purports to be "the World's Leading Solution for Product Design and Innovation". Beyond mere 3D modeling, CATIA offers tools for clear design, mechanical engineering, electrical and fluid systems design, as well as systems engineering. After producing models, CATIA enables developers to piece together parts and view models interacting in realistic simulations with impressive quality. These almost-real digital constructions are of such high quality that they are often used in advertising or for display purposes on their own.

    Beyond its surface-level offerings, CATIA is capable of advanced surface modeling, industrial design concept engineering, reverse engineering and surface reuse, systems simulation, embedded systems modeling, systems safety analysis, tooling design, electronics engineering, electrical design, structural part and assembly design, style-to-surface comparative modeling, mechanical systems design, and more. As with other software of its kind, CATIA is used in almost every major industry where it can be used - including aerospace, automotive, shipping, energy, medical, and high-tech electronics.

    CATIA has the highest barrier to entry for any 3D modeling program in the world. Like elite enterprises themselves, CATIA is a broad, deep ocean of capabilities and knowledge. An unprepared user could easily drown. Nonetheless, CATIA is behind some of the most advanced engineering projects on the planet and for some enterprises, the high cost is justified.

    Although CATIA representatives will discourage people from posting the real price of the software suite, information posted by designers seeking quotes has tagged the price for a recent release (as of 2012-2013) at anywhere between 9,000 and 65,000 USD per unit, depending upon the number of modules included. An annual maintenance fee of 18% is also levied on the buyer, which can easily bring the lifetime cost of the product over 100,000 USD.

    PTC Creo (formerly known as Pro/Engineer or Pro-E) features productivity tools that can be used in a number of industries. It is a scalable, interoperable suite of design software that enables concept development, prototype modeling, advanced 3D rendering, and dozens of additional functionalities. For 3D CAD modeling, PTC Creo Parametric is the go-to part of the suite. Like SolidWorks and Autodesk Inventor, its interface will be familiar to those familiar with engineering-focused 3D modeling programs. Producing 2D sketches and 3D extrusions helps build objects in a virtual environment. The novel part of PTC Creo comes from the sheer number of extendable, interactive add-ons that can work together with the core programs and share files easily. Bright, colorful models come to life quickly on the screen - giving a more intuitive sense of models and more intuitive editing tools than some comparatively priced software.

    PTC Creo provides in-depth control of complex geometries and parametric objects. Crucially, it enables the generation of complete digital representations of products or parts being designed - something that few similar programs profess to offer. Its capabilities can generally be split into three sections: engineering design, analysis, and manufacturing. Data can be represented as renderings or as 2D drawings.

    Free 30 day trials and a free academic edition are available. The full version and its elements have a pricing structure that is difficult to find without requesting a quote; however, Creo Parametric is reported to cost 3,500 USD.

    Rhinoceros (Rhino) and its associated products (named after other animals) are relatively enduring tools in the 3D modeling space. Development of the initial version occurred more than two decades ago. Rhino is currently in its fifth version.

    More focused than 3DS Max, Rhino offers a broad range of tools for modeling, editing, drafting, 3D capture, analysis, and rendering. The suite is used mainly for modeling mechanical designs and managing engineering projects, although it can be used for virtually any 3D task. The interface is relatively simple, setting the barrier for entry comparatively low. While not as robust as Autodesk Inventor, a full license for Rhino 5 costs only 995 USD. Multi-month free trials are also available.

    Maya is another advanced offering from Autodesk, including tools for 3D animation, modeling, simulation, rendering, and compositing. The program is immensely capable, able to easily integrate 3D motion, 3D modeling, and cinematic-quality interactions. It is arguably more capable than necessary for 3D modeling of components to print with 3D printers, but the functionality is all present at its core.

    A single license costs 3,675 USD, while a free 3-year license is available for students. Short-run free trials are also available.

    SolidWorks is built from the ground up for mechanical design. It has a broad and robust feature set perfect for 3D CAD, product data management and consolidation, simulation, technical communication, and electrical design. Solidworks is used in virtually every industry that could have need for custom-designed parts, including but not limited to: aerospace, automotive, construction, energy, manufacturing, medical, industrial equipment, and high-tech electronics.

    Along with dedicated archives, live support, forums, blogs, user groups, individualized programs, extensive documentation, and a host of other resources, SolidWorks is equipped to deal with enterprise-level institutions and individuals alike.

    The software itself is complex, but very responsive. Interfaces in Autodesk Inventor and extremely similar and users familiar with one will find picking up the other takes only moments.

    A single-user license for SolidWorks costs 3,995 USD, while a professional license costs 5490 USD. Free trials are not guaranteed and must be requested. They are not available for students at any time.

    123D is a suite of software developed by AutoDesk. Including tools for sculpting, modeling, drawing, creating circuit projects, 3D file manipulation, and much more, the suite is geared for beginning users and enables them to produce compelling models with relatively simple tools. TinkerCAD, although hosted separately, was added to the suite in 2013.

    Programs within the suite can be downloaded to computers and mobile devices, or launched live on the web on supported browsers. Simple design and responsive tools enable users of any skill level to produce quality 3D models which can then be exported for 3D printing. As with most freeware, 123D suite programs lack robust tools and detailed attention given to units - making them inadequate for complex mechanical assemblies or printed parts whose accuracy is crucial to their operation.

    Blender is a free and open source 3D animation and modeling program. It supports a broad array of 3D processes, including: modeling, rigging, animation, simulation, rendering, compositing, and motion tracking. It even enables video editing and video game creation. Open scripts enable further customization. Since the entire project is community-driven and free, frequent updates and changes to the original source code are released - giving Blender more responsiveness than some larger, more tightly-controlled programs.

    Even with its fully-featured 3D environment, Blender lacks some of the more robust and powerful tools present in paid/premium software - such as those specifically designed for prototyping and mechanical engineering reducing the number or severity of sharp intersections between surfaces.

    FreeCAD is a parametric 3D modeler. Parametric modeling allows you to easily modify your design by going back into your model history and changing its parameters. FreeCAD is open source (LGPL license) and completely modular, allowing for very advanced extension and customization. It also lends itself very well for scripting since nearly every feature can be accessed through its Python API.

    OpenSCAD is free software for creating solid 3D models. Unlike Blender or TinkerCAD, OpenSCAD focuses specifically on the mechanical dimensions and properties of CAD models instead of their artistic properties. It is ideal for creating machine parts and detailed mechanical models. It is not, however, useful for creating animated movies or graphical renderings.

    OpenSCAD enables a user to build models from 2D outlines or by compositing solid geometry, as in many premium programs. It enables export in common file formats and supports STLs for 3D printing.

    SketchUp is a free 3D design program curated by Trimble. It includes a library full of free 3D models which anyone can use and to which anyone can contribute. Its Layout feature enables 3D models to be converted into realistic drawings easily - these can then be exported in a variety of file types, in addition to the ordinary export options afforded to its 3D modeling suite.

    A Sketchup Pro License costs many hundreds of USD and adds additional features and functionalities. Its low barrier to entry and the ease with which a user can create or import models makes SketchUp an appealing tool for beginning 3D modelers. As with other free software, it lacks the robust features and complex assembly features that premium programs often contain. Advanced users may find its simple interfaces lacking, but this is precisely why it appeals to beginner users.

    TinkerCAD Unlike standalone 3D modeling software, exists only online and functions on a variety of browsers (although Google Chrome or Mozilla Firefox are recommended). TinkerCAD has a low barrier to entry and is free to use. Beginning users are guided through the 3D design process with lessons, teaching basics before allowing users to move on to more advanced techniques. Founded in 2011, the software package was acquired by AutoDesk in 2013 and was rolled into the 123D family of products.

    ___________________

    This post is provided by Fictiv, the most efficient manufacturing platform for fabricating parts. Powered by a distributed network of highly vetted vendors, the online interface makes it easy for customers to get instant quotes, review manufacturing feedback, and manage orders—all through a single service.


    Source: A List of CAD Software Programs, Both Paid and Free