Pages

Saturday, December 10, 2016

Six easy ways to customize your site by using Web Parts

You don't have to be a professional Web site designer or software developer to customize your Web site created in Office SharePoint Server 2007. By using the built-in Web Part features described in this article, you can easily customize your site's home page and the other Web Part Pages that are stored in your site.

Becoming familiar with Web Part customization techniques gives you a range of page-customization choices. For example, you can customize your site's home page so that it displays the specific information that your team needs. You can rearrange the list items on the home page, add lists, and even change the images on the home page. As you become more familiar with Web Part Page customization techniques, you can build interactive Web Part Pages that make the data in lists more dynamic and useful, and you can add new Web Parts that provide access to external data and Web services.

In this article

A short Web Part overview

Add an image to a page

Add a list to a page

Add text to a page

Add a Web page to a page

Change a Web Part's appearance and layout

Display images from a list

Conclusion

A short Web Part overview

To help you succeed with the tasks described in this article, here is a short overview of Web Parts.

Web Part Pages and Web Parts

A Web Part Page is a special type of Web page that consolidates data — such as lists and charts — and Web content — such as text and images — into a dynamic information center. The home page of your site is a Web Part Page, and you can easily create other Web Parts Pages in your site. A Web Part Page contains one or more Web Parts, which are the basic building blocks of the page.

To create a Web Part Page, click the Site Actions menu, and then click Create Page. Type a name for the page, choose a layout, and specify the document library in which the Web Part Page will be stored (Web Part Pages that you create must be stored in document libraries).

The following picture shows the Web Part features of a Welcome page based on the Team site template.
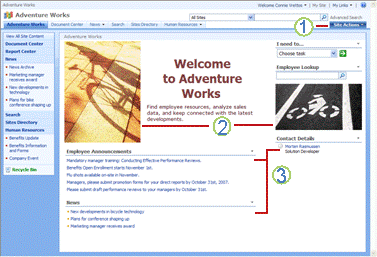
Welcome page

1. Site Actions menu

2. Image Web Part

3. List View Web Parts

Most Web Parts are designed to display a specific type of data, such as text, HTML, or images. When you create a site based on the Team Site template, for example, the site includes Web Parts that display lists, images, text, and other content. By adding these Web Parts to Web Part Pages, configuring them, and connecting them, you can create dynamic information portals that present information to your site's users in an organized and convenient way.

As you try out the techniques described in this article, keep in mind the following:

  • To change the shared view of the home page or of any Web Part Page, you must be a member of a site group with the Add and Customize Pages permission. By default, the Add and Customize Pages permission is included in the permission levels of the Designer and Owners site groups.

  • The examples in this article use a non-publishing site. If you are working with a publishing site, you will see the page editing toolbar, which you can use to edit, add, and modify Web Parts and to save any changes.

    Publishing toolbar

    For more information on working with publishing sites and pages, see the article Work with pages in a publishing site

  • Web Part zones

    Web Part zones are containers for Web Parts on a Web Part Page that group and organize Web Parts. Each Web Part zone on a page has a title such as Header, Footer, or Left Column. The outlines of Web Part zones, along with their titles, appear only when you are designing the page. When site participants use a page, the outlines of Web Part zones and their titles do not appear.
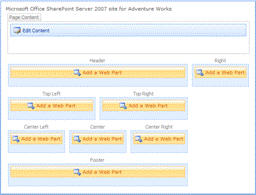
    Team Site example

    Web Part galleries

    A Web Part gallery is a central warehouse of Web Parts that you use to locate a specific Web Part when you are designing a Web Part Page. The site Web Part gallery is often the most central Web Part gallery for your work group. By default, its name is the name of the top-level site in your site collection. For example, if the top-level site in your site collection is "AdventureWorks," the site collection Web Part gallery available to you is named "AdventureWorks Web Part Gallery." You can find all of the Web Parts that you will need to complete the tasks described in this article in your site Web Part gallery.

    Top of Page

    Add an image to a page

    By using the Image Web Part, you can add an image to your site's home page or to a Web Part Page. The image that you display can be from a document library or picture library in your team site, or it can be from an external Web address.

  • On the Site Actions menu, click Edit Page.
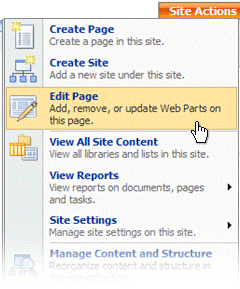
    Edit page

    Notice that the page has switched to Design mode, and the page's Web Part zones and their titles are visible.

  • Click Add a Web Part in the Web Part zone that you want to add a Web Part to.

    The Add Web Parts window opens.

  • Click Advanced Web Part gallery and options at the bottom of the window.

    The Add Web Parts tool pane opens to the right of the page. This tool pane contains all the Web Part galleries that are available to you.
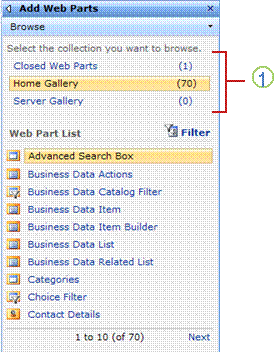
    Add Web Parts tool pane

    1. Web Part galleries

  • Click the name of your site Web Part gallery and then, in the Web Part List, find the Image Web Part.

    If the Image Web Part does not appear in the list, click Next until it appears.

    Note: If you cannot find the Web Part that you want, the owner of the top-level Web site might have removed it or changed its title. For assistance, contact the owner of the top-level site.

  • Drag the Image Web Part into one of the Web Part Zones on your page. If other Web Parts are in the same zone, use the insertion bar to place the Image Web Part.

    Next, associate an image with the Image Web Part.

  • On the Image Web Part, click the Edit button Web Part menu , and then click Modify Shared Web Part.

    The Image Web Part tool pane opens. You use the Web Part tool pane to configure a Web Part's unique properties and to choose general settings that control the Web Part's layout and appearance.
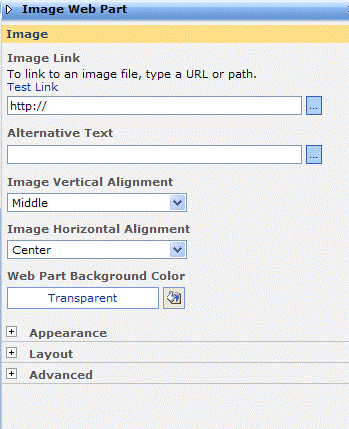
    Image Web Part properties

  • In the Image Link field, type the URL of the image to display. This can be an image you have imported into your site or an image on another Web site.

  • Click OK.

  • Top of Page

    Add a list to a page

    When you create a built-in or custom list, Office SharePoint Server 2007 creates a Web Part that you can use to display that list. For example, when you create a site from the Team Site template, it comes with built-in Announcements, Contacts, and Events Web Parts. You use these Web Parts (collectively called List View Web Parts) to add a view of a list to your home page or to any Web Part Page.

    In this procedure, you insert a view of the default Contacts list onto a page.

  • On the Site Actions menu, click Edit Page.

    The Add Web Parts tool pane opens.

    Notice that the page has switched to Design mode, and the page's Web Part zones and their titles are visible.

  • Click Add a Web Part in the Web Part zone that you want to add a Web Part to.

    The Add Web Parts window opens.

  • Click Advanced Web Part gallery and options at the bottom of the window.

    The Add Web Parts tool pane opens to the right of the page. This tool pane contains all the Web Part galleries that are available to you.

  • Click the name of your site Web Part gallery and then, in the Web Part List, find the Contact Details Web Part.

    If the Contacts Web Part does not appear, click Next until it appears.

    Note: If you cannot find the Web Part that you want, the owner of the top-level Web site might have removed it or changed its title. For assistance, contact the owner of the top-level site.

  • Drag the Contacts Details Web Part into one of the Web Part Zones on your page.

    Next, learn how to change the view of the list displayed in any List View Web Part.

  • On the Contacts Details Web Part, click the Edit button Web Part menu , and then click Modify Shared Web Part.

    The Contact Details Web Part tool pane opens.

  • Configure the properties of the Web Part as needed. To learn more about setting properties in List View Web Parts, see the article List View Web Part.

  • Click OK to save the configuration and close the Contact Details tool pane.

  • Top of Page

    Add text to a page

    You can add formatted text, tables, hyperlinks, and other HTML code to a page, without knowing HTML syntax. This is useful, for example, for adding introductory text or for providing instructions about how to use a page.

  • On the Site Actions menu, click Edit Page.

    Notice that the page has switched to Design mode, and the page's Web Part zones and their titles are visible.

  • Click Add a Web Part on the Web Part zone you want to add a Web Part to.

    The Add Web Parts window opens.

  • Click Advanced Web Part gallery and options at the bottom of the window.

    The Add Web Parts tool pane opens to the right of the page. This tool pane contains all the Web Part galleries that are available to you.

  • In your site Web Part Gallery, in the Web Part List, locate the Content Editor Web Part.

    If the Content Editor Web Part does not appear, click Next until it appears.

    Note: If you cannot find the Web Part that you want, the owner of the top-level Web site might have removed it or changed its title. For assistance, contact the owner of the top-level site.

  • Drag the Content Editor Web Part into a Web Part zone.

  • In the Content Editor Web Part, click open the tool pane.

    The Content Editor Web Part tool pane opens.

  • To add text, click Rich Text Editor.

    The HTML Editor opens. The HTML Editor provides a familiar text editing interface that you can use to add HTML content to the page.

  • Click the text-entry area in the HTML Editor window and type text to display on the page. Experiment with the formatting and editing options available in the HTML Editor.

    For a complete reference for the formatting and editing commands, click the Help button Button image in the HTML Editor.

  • In the HTML Editor, click OK.

  • Click OK to close the Content Editor tool pane.

  • Top of Page

    Add a Web page to a page

    You use the Page Viewer Web Part to display a Web page, file, or folder on a Web Part Page. For example, you could use the Page Viewer Web Part to display a favorite Internet news source on a Web Part Page.

  • On the Site Actions menu, click Edit Page.

    Notice that the page has switched to Design mode, and the page's Web Part zones and their titles are visible.

  • Click Add a Web Part on the Web Part zone you want to add a Web Part to.

    The Add Web Parts window opens.

  • Click Advanced Web Part gallery and options at the bottom of the window.

    The Add Web Parts tool pane opens to the right of the page. This tool pane contains all the Web Part galleries that are available to you.

  • In your site Web Part Gallery, in the Web Part List, locate the Page Viewer Web Part.

    If the Page Viewer Web Part does not appear, click Next until it appears.

    Note: If you cannot find the Web Part that you want, the owner of the top-level Web site might have removed it or changed its title. For assistance, contact the owner of the top-level site.

  • Drag the Page Viewer Web Part into a Web Part zone.

  • In the Page Viewer Web Part, click open the tool pane.

    The Page Viewer Web Part tool pane opens.
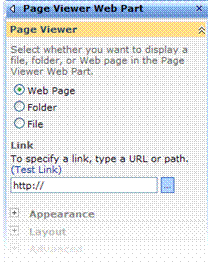
    Page Viewer Web Part Toolbar

  • In the Page Viewer field, make sure that Web Page is selected.

  • In the Link field, type the URL of the page to display.

  • Click OK to close the Page Viewer tool pane.

  • Note: You might have to adjust the Page Viewer Web Part's height and width so that the content in the Web Page it displays is easier to view. A method for changing the height and width of a Web Part is described next.

    Top of Page

    Change a Web Part's appearance and layout

    This article has so far described techniques that you can use to put different types of information on your home page or on a Web Part Page. To make your pages more attractive and useful, here are some general techniques that you can try with any Web Part. By using these techniques, you can change the appearance and layout of a Web Part.

    To open a Web Part's tool pane, click the Edit button Web Part menu , and then click Modify Shared Web Part.

    Change the title

  • In the Web Part tool pane, click the plus sign (+) next to Appearance to expand the Appearance section.

  • In the Title field, type the Web Part's new title.

  • Click OK to apply the changes and close the tool pane.

  • Specify the height and width

  • In the Web Part's tool pane, click the plus sign (+) next to Appearance to expand the Appearance section.

  • In the Height field, click Yes, type the value of the height, and select the units, such as Pixels or Centimeters.

  • In the Width field, click Yes, type the value of the width, and select the units.

  • Click OK to apply the changes and close the tool pane.

  • Minimize a Web Part by default

  • In the Web Part tool pane, click the plus sign (+) next to Appearance to expand the Appearance section.

  • In the Chrome State field, click Minimized.

    Site users can view a minimized Web Part by clicking Restore on the Web Part's menu.

  • Click OK to apply the changes and close the tool pane.

  • Remove the border

  • In the Web Part tool pane, click the plus sign (+) next to Appearance to expand the Appearance section.

  • In the Chrome Type field, do one of the following:

  • To display just the title bar, select Title Only.

  • To display the title bar and border, select Title Bar and Border.

  • To display the Web Part without a title or a border, select None.

  • To display the border only, select Border Only

  • To use the Web Part's default display style, select Default.

  • Click OK to apply the changes and close the tool pane.

  • Top of Page

    Display images from a list

    This exercise builds on the techniques that you have learned so far in this article. By following these steps, you will learn how to connect two Web Parts so that the content displayed in one Web Part is based on a selection in the other Web Part. You will connect a List View Web Part that contains links to images to an Image Web Part. By doing this, you will let users view each image in a separate Web Part "window" as they select each list item.

    Before you start this exercise, create a list that contains, for each item, a link to an image. Any list with a field of type Hyperlink or Picture will work. Note that the Links list that is available by default when you create a team site has a URL field that you can use for this purpose.

  • In your Web browser, go to your site's home page or to any Web Part Page.

  • On the Site Actions menu, click Edit Page.

    Notice that the page has switched to Design mode, and the page's Web Part zones and their titles are visible.

  • Click Add a Web Part on the Web Part zone you want to add a Web Part to.

    The Add Web Parts window opens.

  • Click Advanced Web Part gallery and options at the bottom of the window.

    The Add Web Parts tool pane opens to the right of the page. This tool pane contains all the Web Part galleries that are available to you.

  • Locate the Links Web Part with the list of links that you will use in this exercise, and then drag it into a Web Part zone.

    The name of the Web Part is the same as the name of the list. If you use the Links list, for example, click Links Web Part.

  • On the Image Web Part, click the Edit button Web Part menu , point to Connections, point to Get Image From, and click the name of the list of links, such as Links.

    The Edit Connection -- Web Page Dialog opens. You use this dialog box to configure the connection between Web Parts.
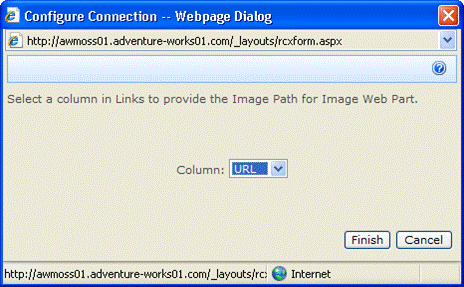
    Configure connection

  • In the Column field, select the name of the field containing hyperlinks to images, such as URL, and click Finish.

    Note that radio buttons are inserted at the beginning of each list item in the list that contains the links to the images.

  • Click the Close button close button at the top of the Add Web Parts tool pane to close the tool pane.

  • Try clicking the radio buttons in your list of links. Each image appears in the Image Web Part as you click a list item.

    Top of Page

    Conclusion

    This article covered six basic customization techniques. By using these techniques, you can adapt your site to meet your group's needs.

    You can remove customizations by using the following steps:

    Delete a Web Part

  • On the Site Actions menu, click Edit Page and locate the Web Part you want to delete.

  • On the Web Part, click the Edit button Web Part menu , and then click Delete.

    You are asked to verify that you want to delete the Web Part.

  • Click OK in the message window.

  • Click Exit Edit Mode to exit the Design mode of the page and save your changes.

  • You can close a Web part by clicking Close on the Edit menu. Closing a Web Part removes a Web Part from the Web Part Page and moves it to the Web Part Page Gallery. A closed Web Part (as opposed to a deleted Web Part) is still technically on the Web Part Page, but is not available until it is reactivated by dragging it onto the page from Web Part Page Gallery.

    Remove a Web Part connection

  • On the Site Actions menu, click Edit Page and locate the Web Part for which you want to remove the connection.

  • On the Web Part that you created the connection from, click the Edit button Web Part menu , point to Connections, point to Get Image From or Get Sort/Filter From, and then click the name of the list that you connected to.

  • At the top of the Edit Connection -- Web Page Dialog, click Remove Connection.

  • Click OK.

  • Click Exit Edit Mode to exit the Design mode of the page and save your changes.

  • Top of Page


    Source: Six easy ways to customize your site by using Web Parts

    Friday, December 9, 2016

    What is Browser Support?

    Often browser support is seen as a given, casually sweeping discussions under the carpet, until a customer finds a bug on a specific browser.

    Unfortunately, there is often a lack of understanding of what browser support is. It's easy to blame the client for this but it's our fault. The web industry has spent the last two decades providing clients with beautiful mockups of their websites with the expectation that the final product will match. This has never been the case and has only been magnified by the introduction of responsive web design.

    Why do browsers display pages differently?

    Browsers fetch the content of a web page and render it for you to see. The W3C is an organisation that sets the standards for how browsers should render elements in code (HTML and CSS).

    In theory this means all browsers should interpret pages exactly the same. In reality most modern browsers do exactly this but for older ones there are many more inconsistencies. Before we get the pitchforks out for the browser manufactures, this isn't necessarily their fault:

    Standards take years to implement so browsers try to interpret the draft specifications as best as they can. This can lead to inconsistent interpretations between browser manufacturers.

    Like all software, browsers have a lifespan and fall out of date. Most modern browsers automatically update so this is becoming less of an issue. For older versions that don't receive these updates people get stuck on a certain version. This is common for old versions of Internet Explorer. This could be because they're part of a large network that is lagging behind or because the operating system they're on doesn't support newer updates.

    What does browser support mean?

    Browser support is often perceived as the page looking the same in a range of browsers. This isn't the case. Web pages may look different on different devices, operating systems and browsers but we would still class them as being supported.

    A good example is how fonts are rendered. The fonts available and how they're rendered varies for different operating systems and devices (iOS, Android, Windows and macOS). When we code websites we take this into account and tell the browser to use a range of fonts with varying priority. This means if a certain font isn't available on the user's device it will fallback to a similar one.

    Why do browsers display pages differently?

    Above is an example of how this website chooses the most optimised font for each device. This means our website will look different but we're taking advantage of the best available font on that device.

    Just because the website looks different, doesn't mean they're not supported. Support refers to the ability to be able to easily navigate, interact and order from a website.

    Supporting from the start

    Different websites will require different browser support. Some websites may have higher traffic on older browsers, for example intranets or institutional websites. Gov.uk have released all their website statistics. The Gov.uk website statistics are a great baseline for British based websites that are either new or don't have enough traffic to make a clear judgement.

    Recommended for You

    Webcast, December 14th: Measuring Micro-Moments With Google Analytics

    Deciding early which browsers you're going to support is important. By knowing upfront we're able to tailor the technologies and code we use to ensure these browsers are supported. Retrofitting support can be costly and introduce a significant amount of technical debt to the project – more on this later.

    Out of our control

    Having the discussion upfront is important because sometimes we're unable to support certain browsers for technical reasons. For example, most payment gateways no longer support old versions of Internet Explorer for security reasons. This means that on most eCommerce websites you won't be able to purchase if you're running Internet Explorer 8 or below.

    The platforms and technologies we use may also have limiting factors on support for older browser versions. If you're desperate for support for certain browsers this may affect the platforms and technologies chosen for your project so the earlier this is raised, the smoother the project will go.

    Progressive enhancement

    Progressive enhancement is a popular way to develop websites. This involves layering technologies (and therefore enhancements) on top of each other ensuring that at every stage the website works. This enables a core set of features to work on all browsers.

    Progressive enhancement has the following principles:

  • Basic content should be accessible to all web browsers.
  • Basic functionality should be accessible to all web browsers.
  • Sparse, semantic markup contains all content.
  • Enhanced layout is provided by externally linked CSS.
  • Enhanced behaviour is provided by unobtrusive, externally linked JavaScript.
  • End-user web browser preferences are respected.
  • Following these principles will can create a website that is supported on most browsers. You might also note that the principles encourage enhancement of web pages, therefore allowing them to behave and look differently to match the users environment.

    Working this way offers two benefits:

  • There will be some support for older browsers. Because new technologies are layered on top of each other it means if one isn't supported, the website will still work (although the experience might be a little janky).
  • There are many reasons a website could break on someone's computer. For example if they're using an ad blocker it could stop a certain script from loading. Ensuring the site works without these technologies means people still receive an experience that works.The cost of supporting older browsers
  • Before we all jump and say let's support everything, there are some significant downsides and they generally revolve around cost. To initially support an older browser isn't that much of an overhead, especially when agreed up front. The cost of retrofitting it can be significant – in time, money and technical debt.

    To support older browsers there needs to be an open discussion about the implications:

  • The older the browser support required, the greater the number of workarounds will be required. This increase in amount of code may impact the overall website performance.
  • The ongoing maintenance costs can be significant. We need to test on more devices and browsers and keep maintaining the additional code required to support them.
  • There may be technical constraints to supporting older browsers. You must expect certain browsers not to include some functionality, especially on more complex websites.
  • Even with support, the experience for customers might be pretty clunky.
  • Technical debt

    Technical debt is something that often goes unnoticed until it's too late. Technical debt is defined as:

    Technical debt is a concept in programming that reflects the extra development work that arises when code that is easy to implement in the short run is used instead of applying the best overall solution.

    If older browser support is considered from the beginning, the technical debt is reduced (but not removed) because the code can be written with support in mind. If it is retrospectively added, the technical debt can increase significantly with support being added in the form of hacks or large pieces of work requiring a lot of code refactoring.

    Investing time and money in the right place

    Choose wisely when deciding which browsers to support. We generally support all browsers that are two versions old. I recommend sitting with your agency to analyse your statistics and decide which devices and browsers should be supported. Keep in mind there are thousands of devices available and it's impossible to explicitly support them all. The more devices and browsers supported, the higher the cost to build and maintain a website.

    Support is a balancing act. Always consider whether the revenue generated from those avenues outlay the investment. You may find that investing in additional features, advertising or conversion optimisation may have a bigger impact on your revenue.

    This article was originally published at www.iweb.co.uk

    Author: Joe Turner

    Joe is the Digital Marketing Manager at iWeb, a Magento eCommerce Agency with over 20 years experience designing and developing eCommerce websites that deliver results. iWeb are accredited Magento developers and also specialise in WordPress and digital marketing services that drive conversions.Joe has spent the last 10 years… View full profile ›


    Source: What is Browser Support?

    Thursday, December 8, 2016

    WordPress vs Drupal vs Joomla : Finding the Best CMS for your website

    If you're thinking about starting a website, there are several routes you can take. First of all, you have to decide if you want to work with a web developer or go the do-it-yourself route. Doing it yourself has many advantages. For one, it's much cheaper. Plus, you'll have full access to edit your content as you please without having to contact your developer to make changes.

    Luckily, building your website on your own isn't difficult when you use a content management system (CMS) like WordPress, Drupal, or Joomla. These programs take a simple, user-friendly approach to web design for people who don't have in-depth technical skills to build a site from scratch. Plus, they're all free.

    Choosing the right one for your situation can be tough if you're not already familiar with these content management systems. Here, we took inspiration from this article which outlines the differences between WordPress, Drupal, and Joomla so you can make the best choice for your site.

    WordPress

    WordPress is a popular choice among new bloggers and site owners, powering over 26 percent of the web. It has a slight learning curve over drag-and-drop website builders, but it's also more powerful and the easiest CMS to learn on this list. It's also good for SEO since search engines tend to like the simplicity of WordPress sites. WordPress is a good choice for small businesses, e-commerce stores, and blogs, though larger sites like Forbes, Best Buy, and Mashable also use WordPress. It's built for blogging, so if you want to start a blog, you'll find all the tools you need to thrive with WordPress.

    WordPress is simple to install. Thanks to its popularity, most web hosts offer one-click installs so you can get your site up and running within about five minutes. With the huge community using WordPress, there are countless blog posts, videos, and tutorials on the web that will help you familiarize yourself with the dashboard and customization options. You can always visit the official WordPress support forum to ask questions and receive free answers within minutes.

    It also has thousands of themes and tens of thousands of plugins—or bits of software that expand your site's function—to choose from, giving it the most options compared to other CMS's. That means there are countless ways to customize your site and make it one-of-a-kind. Though many of these themes and plugins come at a price, there are tens of thousands available free.

    Among the drawbacks, WordPress's ease of use makes it difficult to tweak the visuals of your site without having to touch code. That means that in many cases, you either have to be tech-savvy or hire a developer. That said, there are several premium themes available with built-in drop-and-drag functions and highly customizable features. Take the Divi Theme for example; this theme does wonders for expanding your customization options without having to touch code.

    The other WordPress concern is security. Since WordPress is a high-profile CMS, it's a common target for hackers. Third-party themes and plugins may open security holes in your site that make it easier for security breaches to occur. That said, taking proper precautions, such as by only installing trustworthy plugins, using strong passwords, and updating the software regularly, should help mitigate these security risks.

    Recommended For:

  • Beginners
  • Bloggers
  • Small and Medium Businesses
  • Drupal

    Like WordPress, Drupal is a community-driven project and open source software that uses themes and plugins to manage the appearance and functions of a website. It's also similar in that it's free and easy to install, with most hosts offering one-click installs. Plus, it has a fairly large community all willing to support and help one another.

    Drupal is different from WordPress in that there's a larger learning curve. While it's simple to add new content, it can be difficult for beginners to learn how to navigate the system to change the appearance of their site and add non-content elements. If you do need help, it's more difficult to find an affordable Drupal expert than it is to hire someone to help on your WordPress site.

    Drupal also differs in the amount of themes and plugins offered. Though it has more options than Joomla, it has far fewer than WordPress, and the installation process is a bit more involved.

    While Drupal is the most complicated CMS on this list, it's also the most powerful. Drupal sites are typically faster than WordPress sites, and it's considered more secure than WordPress. It also features pre-packaged bundles that have modules and configurations to help you build a specific type of site.

    Since this CMS is more developer-focused, it's capable of creating highly advanced sites, such as community sites with multiple users. Because of that, you'll need some basic knowledge in PHP, CSS, and HTML. If you're familiar with these programming languages or not afraid to learn, Drupal is an appropriate CMS for building any kind of website at any size. Plus, it scales well, meaning that you won't have a problem expanding your site as your traffic grows.

    When it comes down to which CMS you should choose, Drupal is not the choice for beginners. It's best for people who already have experience in website development. If you aren't very tech-savvy but want to use Drupal for its powerful features, then consider adding someone with development experience to your team or hiring a Drupal expert.

    Recommended For:

  • Tech-savvy users
  • Business of any size
  • Community platforms
  • Joomla

    Joomla falls somewhere between WordPress and Drupal for ease of use, and like both, it's a free open source software that's easy to install on your site. It requires basic technical skills, though it doesn't have as much of a learning curve as Drupal does, and you don't have to be a developer to use it. Compared to both WordPress and Drupal, it has the fewest theme and plugin options, which means it can be difficult to find the perfect template and extensions for your site. Like Drupal, the installation process for these extensions is also a bit more involved than WordPress.

    Joomla is also similar in security to WordPress, and it has a strong community behind it if you need help. However, like Drupal, finding an affordable developer who can help you if needed can be difficult because it's not as popular as WordPress.

    Among its benefits, Joomla is more powerful than WordPress and easier to use than Drupal, which makes it the second most popular CMS for website owners. That said, it can still be a bit overwhelming for beginners. It will serve you well for managing your content, and it even has an incredible content editor that's similar to Word, allowing you plenty of customization options when it comes to your content and formatting. However, it can take a bit more technical knowledge to create a custom design, but if you're willing to learn, you don't have to be too tech-savvy to take advantage of Joomla's power.

    Joomla is particularly a good choice for people who want to set up eCommerce sites. Though you can do that with Drupal and WordPress, it's a bit easier on Joomla. You just need a couple of simple extensions rather than more complicated specializations. It is also the ideal platform if you're looking to set up a social networking site.

    Again, Joomla falls between the other two for technical support. Through Joomla's community portal, you can ask questions and learn more about the system. The community isn't as large as WordPress, so feedback can be slower, but it's typically faster and cheaper than Drupal's support.

    Recommended For:

  • Intermediate tech-savvy site owners
  • Social media networks
  • eCommerce stores
  • Which Should You Choose?

    There's not one choice that's better than the others. It all depends on your site needs and your technical skills. If you're just starting out and don't know anything about CSS, HTML, or PHP, WordPress is the best option.

    If you'd like more power and aren't afraid to get your hands dirty, go with Drupal.

    If you need a happy medium—something that's more powerful than WordPress but less complicated than Drupal—then Joomla is a good choice.

    When all is said and done, WordPress is the best CMS for most people. It's user-friendly, requires no coding skills, and has a huge support community, which means it's easy to find help. Plus, with tons of premium and free WordPress themes, it's easy to find templates suited for your brand.

    Which one of these content management systems do you think you'll use to build your site?


    Source: WordPress vs Drupal vs Joomla : Finding the Best CMS for your website

    Wednesday, December 7, 2016

    Windows 10 Web design

    You may now log-in with the username you have chosen

    DesignShock is the biggest bundle/subscription you can find in one place including icons, avatars, graphic elements, GUI packs, design sets and both web and print templates. All of them are ready and easy to use, for any purpose, created as they have been ,as organized vector based files, for over 10 years of work in partnership of 4 different sites: IconShock, ThemeShock, TemplateShock and ByPeople.

    This set contains an enormous amount of icons which allude to web design elements such as software development, web design tools, color palettes, file formats, layouts, web interfaces, etc. The total count goes up to 2256 unique icon shapes (without counting sizes) and they come in 16, 32, 64, 128, 256 and 512 pixels both wide and high, plus the original vector files in AI & SVG formats. Normal: 16px win10_web_designl_16Normal: 32px win10_web_design_32Normal: 64px win10_web_design_64Normal: 128px win10_web_design_128Normal: 256px win10_web_design_256Normal: 512px win10_web_design_512Addons win10_addons_web_designwin10_addons_web_design2

    Please enable JavaScript to view the comments powered by Disqus.

    We create these freebies with love & hard work, what we ask in return is allow us to send u new freebies to ur email.

    By clicking the Get Download button, You accept to receive discounted deals and freebies on digital products (ByPeople deals & digest) and Freebies for designers and developers (shock freebies)
    Source: Windows 10 Web design

    Tuesday, December 6, 2016

    5 Steps to a Functional and Beautiful Blog Design

    For any small business, a blog has the potential of doing a lot. Some of these functions include: assisting in customer interactions, attracting potential clients, publishing one's thoughts, and getting attention from the search engine. Being a small business, a simple design can be used to save on costs. In recent time, blogs have become easier to run and manage with the advent of templates and online freelancers.

    For entrepreneurs, to benefit from all the advantages blog has for an enterprise, it's critical to create a blog that is attractive. Your site, in this case, should match the brand of your company and also offer the services required from your business. To do this, here are some five simple steps that every blogger, the entrepreneur should follow.

    1. Decide On the Platform On Which Your Blog Will Be Placed

    Although such a point draws no relation to blog design, it is crucial to the making of any site. The choice of software often determines the extent to which your blog requires planning. There are really not many platforms to choose from. However, two of the best choices are TypePad and WordPress.

    ???????? ?? ??????? WordPress and Typepad

    Image Source:www.onlineincometeacher.com

    WordPress is a free online blogging platform. It requires software installation for it to run smoothly on a web server. The platform also requires permanent installation. A further requirement is an additional HTML coding for design customization. On the plus side, WordPress provides an enormous amount of plugins and code modules to improve the functionality of your blog. WordPress will, in this case, work efficiently for clients who can install, run and control their systems and customers and have a wider budget in order to design, maintain and code their sites.

    TypePad is a controlled blog solution. This means that the makers of TypePad control the updates and ensure the stability of the software for its clients. The platform comes with some small monthly cash packages, which weigh lightly on people who wish to have their blogs managed for them. The design options on TypePad are limited to some point, but this falls to the advantage of those individuals with a tight budget. Lastly, the platform also provides plugins and code modules. Such are enough for basic to intermediate level bloggers.

    2. Begin From a Template While Designing Your Blog

    Using a template is an excellent way to get started in blogging. If using TypePad, then designing a blog that is well customized is pretty simple. Here, all that is required is a good understanding of the basic layouts and principles of TypePad.

    Some of the steps are unnecessary if one chooses to use a template. For example, you may not even require applying color palette. The significant disadvantage with choosing to use a template is that your competition may opt to implement a similar one to yours, and it may also appear generic. As a result, such occurrences confuse users and decrease the effectiveness of your site.

    3. Create a Header for Your Blog

    You may choose to use a blog header consisting of simple text on a well-colored background at first. However, coming up with a banner graphic is quite an easy way of making your site unique, memorable, and engaging. Experts recommend that you match your blog headers with other added material, for example, websites, business cards, and pamphlets.

    Items that should appear in your blog header include your logo, blog subhead and the blog title. An addition of photos and graphics will also go an extra mile in ensuring that your site stands out from others. Lastly, you'll also need the last file header to have the same width as your blog. Note that templates vary and hence, it is essential that you confirm it with your provider.

    ???????? ?? ??????? christmas+09+blog+header1

    Image Source:www.janmary.com

    4. Set the Number of Columns

    To do this, you'll require a column consisting of the main text where you can publish your web posts and articles. It is advisable to have either one or two sidebar columns associated with your widgets and links. The size that may be required for the sidebar will solely depend on the content in those columns. It is necessary to consider the content design and similarly, whether that design would appear better in one large column or two narrow ones. Also look at the amount of content you have and ensure that it doesn't go on for too long.

    Image Source:www.impulse-themes.com

    5. Establish the Right Content for Your Sidebar

    The sidebar platform of your blog is simply a place where you can choose to use promotional techniques. For example, a sign-up tool box for newsletters or a promotional product box. It is also a perfect area to advertise and promote further online preferences, for instance, your Twitter feed or main website. Moreover, you can also opt to use the sidebar to offer visitors different ways of subscribing to the blog.

    There also exist other tools known as widgets that go a long way in ensuring that your blog displays a vast range of information. Blog providers typically possess a list of widgets available for installation. Bear in mind that while choosing an appropriate widget, style or fashion are insignificant. As an entrepreneur, you should ensure that you pick the widget that is related to your site.

    Items that should appear in your sidebar include:

  • A promotion and a link.
  • A sign-up box for newsletters.
  • A link to sign-up for blog updates or for later communication via email.
  • A contact form for extended queries or feedback.
  • Latest Twitter posts.
  • A list of blog categories.
  • A link to social media websites such as Facebook and Twitter.
  • A link that describes and defines your character and attributes (your 'about' page).
  • The above are some of the standard and basic methods that every blogger or any other individual thereof should follow to ensure that their blog is attractive and successful. It is essential to exercise patience while designing any website whether personal or for business intended goals. Prey on the intuitive minds of online subscribers for they tend to be more affiliated with beautiful, organized, and unique blogs.

    Lastly, it is fundamental to remember that any blog design should go hand in hand with its website content. A blog layout should, therefore, bear close similarity with the message it is supposed to offer to the readers or online subscribers. Also, it is imperative to make sure that your blog looks nothing like another blog on the web, especially your competitor. This will have very grave consequences for your blogging venture. Take the initiative, create or transform your blog into one that comes to a notch closer to perfection.


    Source: 5 Steps to a Functional and Beautiful Blog Design